
Simplifying Database Operations with JPA and Hibernate: Creating and Persisting Objects


Table of contents


No headings in the article.
In the previous post, we set up a database and JPA configurations, Let's create a Java class Student, and see how to make it work with JPA.
Let us create a Student class with just two fields id and name.
public class Student {
  private int id;
  private String name;
}
To make the JPA know that we want this Java class to be a table in our database, we’ll use the annotations provided by the JPA interface.
The first annotation we are using is @Entity. This annotation tells us that this class is concerned with JPA and we can make database operations with JPA with this class.
@Entity
public class Student {
  private int id;
  private String name;
}
Now let's tell JPA exactly to which table in the database this class is needed to be mapped.
For this, we’ll use the @Table annotation. This annotation can take some parameters inside it.
The name parameter is used to map it with the table in the database.
@Entity
@Table(name = "Student _Table")
public class Student {
  private int id;
  private String name;
}
Even if we already don’t have Student_Table in our database, JPA will create one.
Since we are dealing with a relational database, each table needs a primary key. To mark a member variable as a primary key in the table, we use the @Id annotation.
@Entity
@Table(name = "Student _Table")
public class Student {
  @Id
  private int id;
  private String name;
}
That’s it, now the id member variable is the primary key for our table. In the main class let's create a student object to save it in the database.
public class Main {
  public static void args) {
      Student student = new Student();
      student.setld(1);
      student.setName("Sohail Shah");
  }
}
To save this student object in the database using JPA we need an entity manager object. We get this entity manager object from the entity manager factory method in the persistence class.
public class Main {
  public static void args) {
      Student student = new Student();
      student.setld(1);
      student.setName("Sohail Shah");
      EntityManagerFactory entityManagerFactory = Persistence.createEntityManagerFactory("myPersistenceUnit");
      EntityManager entityManager = entityManagerFactory.createEntityManager();
  }
}
The createEntityManagerFactory the method takes the name of the persistence unit name we created in our persistence context file. In my case it is myPersistenceUnit, but it can be anything.
Now we can save our student object using persist method on the entity manager.
entityManager.persist(student);
This is all we need to do to save our student objects in the database. But we need to surround our persist operation with transactions. Transactions should begin before persisting operation and close after the persisting operation.
We get a transaction object from the entity manager.
EntityTransaction transaction = entityManager.getTransaction();
Using the transaction object to surround persist operation, we’ll have
EntityTransaction transaction = entityManager.getTransaction();
transaction.begin();
entityManager.persist(student);
transaction.commit();
entityManager.close();
entityManagerFactory.close();
Now if we run our application, and check the database we can see that our student object was in fact saved.
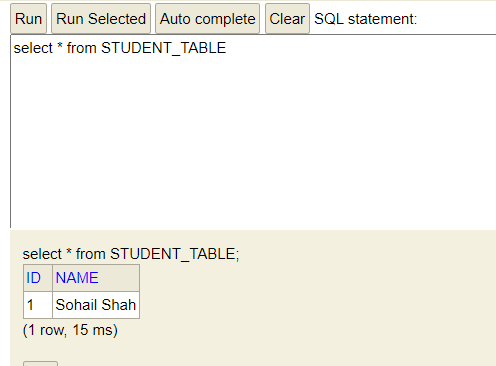
We didn’t have to write any SQL queries to insert data into the tables. We’re working with objects all the time and as Java developers that’s amazing.
Here is the complete main class:
public class Main {
  public static void args) {
      //Creating a student object
      Student student = new Student();
      student.setld(1);
      student.setName("Sohail Shah");
      //Creating a entity manager factory object
      EntityManagerFactory entityManagerFactory = Persistence.createEntityManagerFactory("myPersistenceUnit");
      //creating entity manager using the entity manager factory
      EntityManager entityManager = entityManagerFactory.createEntityManager();
      //creating a transaction object using the entity manager
      EntityTransaction transaction = entityManager.getTransaction();
      //beginning the transaction
      transaction.begin();
      //Persisting the student object
      entityManager.persist(student);
      //committing the transaction
      transaction.commit();
      //closing the entity manager
      entityManager.close();
      //closing the entity manager factory
      entityManagerFactory.close();
    }
}
Click here for the previous post | Click here for the next post